Removing Reverb using Free Plugins
De-Verb plugins seem to be all the rage at the moment, with recent releases from SPL (Deverb), Dyvision (Reverb Remover) and Zynaptic (Unveil) – impressive all around (heck, I _love_ SPL products, and the Zynaptic one looks great) – they also seem to utilize different mechanisms for removing the Reverb so there is even an argument for owning more than one! But we can use a few really simple techniques and mock up a “De-Verb Plugin” for free.
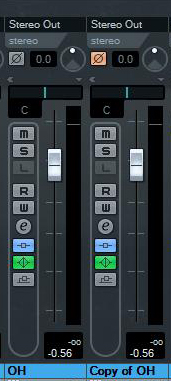
This idea stems from a chat I had with the excellent Bruce Aisher a while back on how Brian Eno (it would be, wouldn’t it ;)) used phase/polarity inversion during mixing. We’re going to do something along those lines here… so make sure you’re familiar with the operation of the Phase/Polarity invert button -> it’ll look something like this (Orange in this Image).

No time now to go into Polarity Inversion, Phase Inversion, the differences between them – you want that, read the daddy of articles over on Sound on Sound – Phase Demystified. Also, I’m doing this in Cubase, but this will work in Logic X, Pro Tools, Reaper, Studio One, FL Studio, SONAR – whatever your flavour of DAW…
The Task
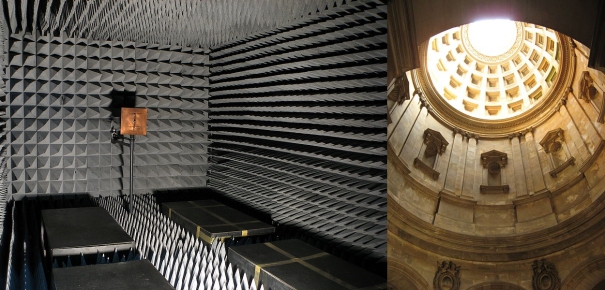
Firstly – what do I mean by De-Verb? Imagine recording Drums in an Anechoic Chamber. Here, there would be no reflections from the walls, ceiling or floor, and you would only hear the attack of the drums and the natural decay from their shells. The moment you place the drums in a real room, you are going to get reflections from the room – ambience. Make the room bigger, give it a more intricate structure, and thousands upon thousands of tiny echos will add together to create a slow decay to the sound – reverb…
Of course, the best solution here is to choose a suitable environment to record those drums in, alongside careful selection and placement of microphones but… that’s not always possible. You may change your mind later down the line… That’s when De-Verb can come in handy – we’re going to attempt to remove a significant amount of the ambience that has been recorded without adversely effecting the quality of the recording.
The Solution
We could just start with a Transient Designer… and you probably should! You could try something like the Universal Audio SPL Transient Designer (the SPL De-Verb is apparently a re-work of this very effect)… and Stillwell Audio (who we’ll be coming to in a moment) have you covered with the rather excellent Transient Monster (1). With these, we can tweak the Attack portion of a sound and boost it, and then separately attenuate the Release portion of the sound – the ambience. This is a bit of brute force, but it can work. But it’s not really De-Verb… so…
I mentioned phase/polarity invert a few lines back… and if you’re not sure what happens when you phase invert a signal – try this. First, insert and play some audio on any channel in your DAW. Flip the Phase Button a couple of times – hear any difference? Hopefully not. But now, _duplicate_ the track (literally – plugins and all, EQ settings, the lot – most DAWs should be able to do this for you – in Cubase, right click the track and select ‘Duplicate Track’). Now play both of them together – it should be louder. But, flip the Phase on _one_ of the tracks and what happens? The audio vanishes. This is what Polarity/Phase Invert allows you to do – completely cancel out two channels of audio.
Why would we want to do this? This trick only works if the audio streams are identical. The slightest change to either track and audio will start to leak through and you won’t get the same result. What we’re going to do is flip the phase of a second, duplicate channel, then change the audio on that channel, but only where we want sound to leak through (in this case, the Attack of the drum) – where the audio is that we don’t want (the reverberance of the room) , we’re going to leave that alone – the two channels will be identical at those points, will cancel out and be inaudible, The perfect tool for this?
A Compressor.
Seriously, this is all we need :). Compressors modify the volume of output audio based on loudness of the input, so when the sound is loud, we’ll compress the polarity/phase inverted channel (very heavily), making the two tracks different from each other which will allow the audio to leak through from the primary track. Between the hits, where the sound is quiet, the compressor will no longer be working, so the two channels of audio will be identical and will cancel out – no audio will be heard.
The Tools
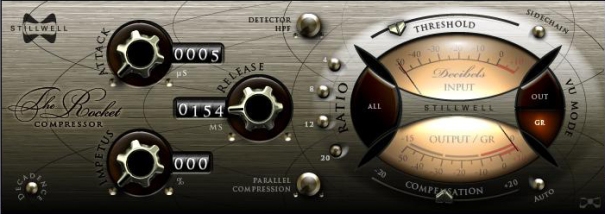
For this, I’m using a ‘free’ compressor that will run in most major audio hosts – Stillwell Audio’s The Rocket. In reality, The Rocket isn’t free, but it does have an eternal demo mode so you can try it out. It’s also (like pretty much all of Stillwell’s plugins) pretty awesome. Go have a poke around their site, test their plugins and buy a few. Massive recommendation from me here ;). (Pro Tools? Go talk to FXPansion and get a wrapper on it ;)). Why The Rocket? It has exactly the features we want – superfast Attack, reasonably variable release (enough for us, most likely) and huge compression ratios.
How to remove Reverb – The Method
These files were from a quick recording test we did at Grand Chapel Studios a few weeks ago specifically to record Drums with full ambience – so it’s a really open recording. If I remember, this is an old Premier Olympic Kit. Additional Room mics have been muted and, before we got to this stage, we’ve put Audio Gating on the Kick, Snare and Toms to remove ambience before and after each hit. You might think this is a great way to De-Verb – and it is for close mics… but you try this on overheads… Not quite as nice.
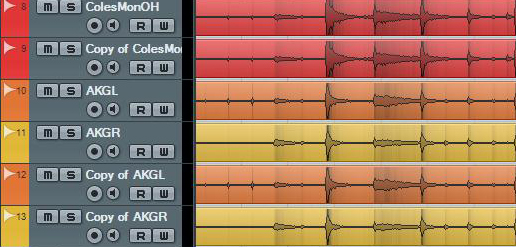
Step 1. Duplicate the Overheads. Here you can see we’ve ended up with AKGL & AKGR, and another pair of tracks, Copy of AKGL and Copy of AKGR. These tracks are identical. We’re also de-verbing the Coles 4038 Mono OH, but we’re just going to ignore that for the moment.
Step 2. Send your main pair of Overheads (AKGL and AKGR) to a Group Channel. Here you can apply any EQ or Compression that you want on the original sound. When you’re happy with that, we can get on with getting rid of that Ambience.
Step 3. Duplicate that Group Channel, give is a sensible name, and the route your COPY tracks (Copy of AKGL and Copy of AKGR in this case) to this new channel. This channel should sound Identical to your previous Group – Excellent!
Step 4. Click the Polarity/Phase button on the new Channel. The sound from your Overheads should vanish. This is a good thing.
Step 5. This is the last, but most importnat step – it’s going to require a bit of tweaking, but I’ll give you a starting point. Pop a copy of The Rocket in the last pre-fader Insert on the copied channel. If you’re not sure which that is you really should look it up – it’ll allow you much more flexibility in the long run. In Cubase 6 – that’ll be Slot 6. If you can’t find it out – pop The Rocket it in the last slot, and any time I mention mucking around with the channel volume – muck around with the ‘Parallel Compression’ knob in The Rocket – it’ll do the same thing.
Turn the Attack to its lowest setting (to the Left). Leave the Release quite high to start with (we’ll be tweaking that anyway – 500ms will do), whack the Ratio on 20:1, and then select the GR (Gain Reduction) Meter on the right. Now, drag that threshold DOWN. Really… DOWN. We want The Rocket to be hammering the audio. Don’t touch Detector HPF or Parallel Compression (previous note taken into account :)). What you should notice, if you play the audio now, is that you hear something. In fact, you’ll probably hear a lot. What’s happening is that, although the two channels are of inverted polarity/phase, the compressor is vastly changing the inverted channel making it different (and much quieter) than the original channel. They will no longer cancel out. We now need to tweak to get rid of the reverb.
The Gain Reduction meter should be flying to the left, and probably hanging around there. We don’t want that – we need to shorten the release time so the compressor recovers faster. We want the compressor to hit immediately a drum is hit (hence the short attack) but stop compressing during the ambience. For an extreme effect, turn the release down to about 50ms, then edge it back up until you get the kind of ambience reduction you’re after.
I went for fairly (2) subtle reduction on these tracks but you can take it a lot further. Here, try playing the two players in parallel (press play on the first, then play a second or so later on the second) and you can do a comparison. Back in your DAW, for a bit more ‘tweakability’, you could go more extreme on the overall settings and then blend it in more subtly by pulling down the volume of the inverted track in the Mixer. You may also find that in the mix, you can be more brutal with the effect… other instruments are great cover ;).
This also opens up a lot of different avenues. What if we start EQing portions of the inverted phase track – we could let more reverb through in certain frequency ranges. Here, we’re working with a classic style compressor – we have static attack and release times, and a variety of ratios to choose from. But what if we chose a limiter with program dependent release? What about the compressors with program dependent or interesting non-linear release curves? (3) What happens if you start mucking around with Transient Designers as well? In fact, on a later revision of this, we were using the Universal Audio SPL Transient Designer to tweak the release in the overheads and I’ve also had good results generally with Transient Monster – it really adds to the effect.
This method, as far as I can work out, is definitely one for punchy, short lived sounds like Drums and picked Acoustic Guitars. I’ve yet to try any commercial De-verb products, but I imagine they also struggle with long, relatively quiet sustained sounds with minimal dynamics. I can’t immediately think of any simple, non-spectral processing dealing with that (though I’m not saying it can’t be done… leave that to the fantastic mathematicians, engineers and theorists who work for these companies – hats off to those guys :)). Also, with this method, you can’t simply remove the ambience that is absolutely tied to the transients themselves – when the drummer hits the drums, the microphones _will_ pick up the room – we’re just hiding the effect of that in the ‘release phase’. But equally, try not to record in an environment which is unsuitable or un-adaptable for the sound you’re after :).
So, there you go – removing reverb for free. Any thoughts?
Footnotes:
(1) If Stillwell or UA aren’t to your taste, or you want a Transient Designer which is totally free – try Flux Bittersweet 2. It’s a cracking plugin.
(2) Definitely a fast job here. I’m not totally happy with the release pattern on this recording, but as a demo, it works quite nicely. Can you hear the ‘mistake’? :).
(3) Plenty of options here. On PC and Cubase – you should definitely try Variety of Sound ThrillseekerLA. It’s got everything we need. Cross Platform – how about Vladgsound Molot – absolutely love this compressor generally – great on the Drum Buss ;). Oh, and you might try FXPansion DCAM FreeComp – though this has program dependent release., it’s also a fantastic compressor. With all of these, turn off any saturation provided by the plugin first – it’ll muck around with your phase cancellation. Finally, there’s no harm in using a DAW bundled compressor… It’ll still work. I just liked The Rocket for this.


Nice! Great article.
Thanks! I’ve been so up to my neck in sessions recently I haven’t had a chance to post a follow up to this, along with a few other bits and bobs I’ve been working on… Roll on February at this rate ;).
[…] – there will be more here. If you haven’t checked it out, the De-Verb for Free article has had a hell of a lot of hits since I wrote it – and we’ve used it in […]
Yaassss Mike! Thank you
What! Too cool. I had an artist send me vocals with a little too much reverb mixed in. I used an EQ compressor (stock with Cubase) to compress the super high end but then That caused other issues so I polished it with the over all channel EQ. It sits in the mix better but, I will give this way a try to see what happens.
Thanks!
It’s polarity that’s being inverted, not phase.
Do you know what – I’m usually so picky about the difference between polarity/phase inversion, I’m amazed that slipped through :).
Ah, no, re-reading, I think I called it both because people muddle it up day to day… But it’s definitely polarity inversion :). Or as Pure Data would have it [*~-1] 😀
This is a really cool concept, but I’ve been trying it a bit with speech and… why is this any different to using a noise gate? Or have you basically devised a way to implement a compressor as a noise gate here? It doesn’t clean up quite as well with the detailed waveform of speech i guess, because an extended loud section has the “early reverb” overlaying the later loud part of the loud section
You’re absolutely right, it’s not a panacea – it’s another tool in the arsenal (and essentially, yes, we’re using compression and polarity inversion as a noise gate). I think it’s most powerful when used with material that has very strong (and loud) transients; after all, that’s ultimately what it’s playing with. But I do find I get different results with a plain noise gate, sometimes better, sometimes worse. Speech -> YMMV (early reflections are always going to be a problem)… But then again, that’s when you start paying people with very clever algorithms money :D.